Friday, September 24, 2010

Fall Frames

I've seen similar projects floating around blogland and decided to try my hand at my own. Here's what you need to make this project:


  • 4 mismatching frames (mine were a mix of 3x5, 4x6 and 5x7 frames from the Dollartree)

  • Spray paint (I used black)

  • Die Cut letters (I used black vinyl)

  • Scrapbook paper

  • Any wanted embellishments


I started out by removing the backs and glass from all of the frames, getting them ready to be spray painted:


Then they got a couple of coats of black spray paint:


Next I picked my scrapbook papers and cut them to size. I used scraps that I had in Fall colors. I also cut my letters to spell "FALL"


After applying the letters I added some ribbon and buttons to jazz up the frames:


And the final product on my piano.


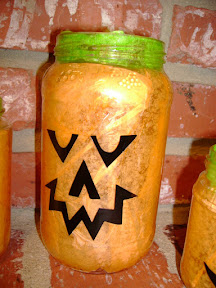
For now I have fall leaves as well as my "Jar Jack-o-Lanterns"

I could see making this same project spelling a variety of words like Winter and Spring. I think Love or Lucky would be cute too!


giveaways


idea room

Sunday, September 19, 2010

Sunday Best

I read (or skim) a LOT of blogs. Mostly craft and cooking blogs that I have found over the years. There are also a few websites that I frequent as well. One of those websites is Sugardoodle! If you are a member of the LDS church it is a wonderful resource for lessons, activities, crafts, etc. This time of year in our faith we are preparing for General Conferece~two days of listening to our General Authorities speak, teach and inspire us. It also consists of 12 hours of watching church for our children! Getting them to stay interested and entertained can be a challange, but here are some helps. Sugardoodle posted a few great conference packets to help us out:

Here are the links for: A Youth Packet, Senior Primary, Junior Primary & Nursery . There is also a wonderful page devoted to General Conference.

So break out the snacks, cuddle up on the couch and be inspired as you listen to our Prophet speak!

Tuesday, September 14, 2010

Ribbon Wreath~FALL

I am so ready for Fall to be here and HOT temperature to be out the door!! Fall decorations are going to start going up around here and I'm starting with a wreath! I was inspired by a wreath I saw over at Tatertots and Jello, but changed it up a bit for myself!

Here's what you need to get yourself started:


  • 12" foam wreath (check out your local Dollartree)

  • 3 yards of a wide ribbon

  • loads of ribbon (I went with a Fall theme~orange, yellow, red, green) cut into 4" peices

  • straight pins

  • any embellishments you want to add


First I wrapped my foam wreath with my wide ribbon. I used 2 straight pins to hold it in place and then wrapped it all the way around, finishing with 2 more straight pins:


Then I made a loop with one piece of ribbon and put a straight pin through it.


Then I added anywhere from 2 to 4 more ribbons and pinned them onto the wreath:

Continue to add bunches of ribbons, mixing your colors and adjusting your loops to cover the front of the wreath:

Take a longer piece of ribbon (about 12" inches) and pin into place as a hanger:

Finish adding your ribbons and then add some embellishments. I found some plastic acorns at the Dollartree:

I randomly glued them throughout my wreath:

Hang on your door and enjoy!

I love how it turned out and look forward to getting the rest of my Fall decor out!
I plan on trying out another type of ribbon wreath in a Halloween or Christmas theme, check it out at The Long Thread!


I'm linking up here over atShow and Tell Green


Creations by Kara giveaways

Organize your embroidery floss

I saw this super cute printable originally at Ucreate and knew I needed to print it up right away! The original is from Wild Olive.


Here's what my embroidery floss looked like before:


I printed the bobbins out on regular white cardstock and started cutting them out.


Here's the result!


What a great way to organize!!

Sunday, September 12, 2010

Wooden Snowmen

After my sister and I made our Snowman Candy bars we had the idea that we should make some that we could use year after year! So I went over to Home Depot and rifled through the cheap wood bin to find some 2x4's that we could turn into snowmen! $1.50 later I had all the w We wanted to make a "family" of snowmen. I made 8 inch tall parents and 6 inch tall kids. We then sanded the wood to get any rough spots off and painted them all white.


After they were completely dry we lightly sanded the edges to make them look a little more rustic and did a coat of very, very light watered down brown & black paint and immediately wiped it off. This gave them an aged look.

Then we measured around the wood and cut pieces of fleece that length and about 10 inches wide and sewed up the side. This is to form the hat for the snowman.

After that we made the cuts for the top of the hat. Make small cuts about 2 inches long into the fleece. When done tie a piece of ribbon or yarn tightly around to form the top of the hat. Also cut a piece of fleece about 1 inch wide by 15 inches long for the scarf. Tie around the middle of the snowman and snip the ends to make the scarf.

Then glue on buttons, googly eyes and a fun foam carrot nose!!

My sister added colored buttons behind the googly eyes to match the eye color of her children. It's a fun addition to personalize the snowmen. We also talked about making a pair of glasses out of wire for her daughter that wears glasses! Neither of us chose Christmas fleece for our snowmen so we could keep them up throughout the entire winter.


Jar Jack-o-Lanterns


When do you put your fall decorations out? I'm in the midst of doing some fall crafts and am about ready to start bringing them out. I found a fun new jack o lantern craft that I just had to try here's where I found it: Not so idle hands


I changed up the tutorial a little bit for myself.

  • First find some old, clean jars (spaghetti, baby food), whatever you have on hand.

  • Then cut 1 inch strips of orange tissue paper

  • Coat 1/2 of the inside of your jar with modge podge

  • carefully place your strips in the jar and smooth up the sides (it's a little messy!)

  • Be sure your strips don't cover the top lip of the jar.

  • Then cut some a little green tissue paper and coat the upper rim on the jar and apply the green tissue paper

  • Let it dry!

  • Apply vinyl jack-o-lantern faces to the fronts of you jars

  • I used battery operated tea lights found at the Dollartree to light my jars.


Here's another set of instructions if you want to make a set of your own: http://www.instructables.com/id/Recycled_Jar_Jack_OLanterns/
Here are a few other fall/Halloween things:


Seasonal Blocks

So when I saw these blocks at Brown Paper Packages, I knew I wanted to make them~
With a set of 7 blocks you can make 16 different word combinations for different holidays, seasons, or whatever you feel like!
Here's the list of words the blocks can make, there may even be more:
Harvest, Welcome, Friends, Faith, Family, Spooky, Winter, Freedom, Blessed, Snow, Home, Hope, Monster, Mother, Dream, Easter.

I decided to take it one more step and add a block that had 6 different images on it~
Holly berries, pumpkin, star (with stars and stripes), Easter egg, tree & a flower. That way you can flip it to match whatever word you have showing.

So what you really need is 8- 4x4 blocks, sanded and painted. The following vinyl letters (you could also stencil them onto the blocks): BLOCK 1- H, Y, E, D; BLOCK 2- A, C, R, S; BLOCK 3- R, P, E, T; BLOCK 4- V, N, L, O; BLOCK 5- E, O, M, D ; BLOCK 6- S, M, K, I; BLOCK 7- T, F, B, W and the 6 vinyl images.

I just sat and watch Grey's Anatomy while I applied all of my vinyl! I'm pretty happy with how they turned out.

Here's where I have it up right now:

Now I have to decide if I want to make more of these or the "be" blocks as some of my Christmas gifts. The "be" blocks will be easier to mail...which would you rather get?


Christmas Ornament Wreath

Ok, I know it's just beginning of November, but if you want to have your decorations up the entire Christmas season you have to have them done early! I saw the idea for making an ornament wreath on Nannygoat and knew I wanted to make one. I hadn't read the tutorial, but saw the picture and figured I could figure it out. It turns out I did it differently then the tutorial she posted (they used a wire hanger). So today I headed over to my local Dollartree and purchased one foam wreath and $7 in plastic Christmas ornaments. I already had glue sticks and some Christmas ribbon.

First I removed the little plastic tops from the ornaments.

Then I started gluing ornaments around the center and then around the outside. Then fill in the spaces.

In all it took me about 30 minutes, 4 mini glue sticks and $8 ($7 in ornaments and $1 for the wreath!).

They have some pretty silver, blue and purple ornaments there, I might have to make another one! I got a mix of 3 small (5 to a package) and 4 large (12 to a pack with 5 left over) ornaments. I also got a foam cone to see If I could make an ornament tree!!

So break out your Christmas crafts and get cracking so you can enjoy them the entire month of December!!


Saturday, September 11, 2010

Butterfly "goodie bag"...

I meant to blog about this cute simple craft right after Emma's birthday. But time got away from me and here we go. I got the idea out of the March 2010 Family Fun magazine and then made some changes to meet my needs. We had a butterfly themed birthday party and I thought it would be fun for the kids to help put together their own goodies for their goodie bags!

Here's what you need to get started: clothes pin, scrapbook paper, googly eyes, glue, pipe cleaner


~Cut your scrapbook paper down to fit one one side of your clothes pin and glue it on. Emma helped me and we used a glue stick. If you wanted them to be more durable you could use modge podge.

~Then glue on your googly eyes and take a short piece of pipe cleaner (about 2 inches). Fold it in half and stick it inside the clothes pin with a dot of glue. After it dries adjust your "antenna" to an angle you like.

We made enough for two butterflies per child:

~Then take a snack sized ziploc bag and fill with candy. Don't fill it too full or you butterfly body won't fit. Once full take your butterfly body and stick it in the middle of your ziploc bag:


The kids had a blast filling their bags and making their own butterflies!

This was a great party favor but would also be a fun add on to a preschool lesson on the life cycle of a butterfly!