Sunday, May 29, 2011

Recipe: Oatmeal Chocolate Chip Waffle Cookies

I came across these while browsing Pinterest (which I love btw, here are my boards if you are interested). I didn't own a waffle iron and headed over to Walmart and bought one just for this recipe. It was relatively cheap, less the $10 and I am glad that I got it. These cookies were quick, tasty and different. They tasted like a cookie yet cooked up fast. Start to finish with mixing up and cooking time was about 20 minutes.

I mixed up the dough/batter in a bowl rather than my Kitchenaid. It's not a large batch and is very quick to put together.


I found the original recipe here on Fine Cooking.  I made some minor changes and was happy with the result.


Oatmeal chocolate chip waffle cookies:


1/2 cup (1 stick) margarine, melted
1/2 cup plus 2 Tbs. firmly packed light brown sugar
2 large eggs
1 tsp. vanilla extract
3/4 cup unbleached all-purpose flour
1/2 tsp. baking soda
1/4 tsp. salt
1-1/2 cups old-fashioned rolled oats (I used quick oats)
3/4 cup chocolate chips (today I happened to have Ghiradelli 60% cacao bittersweet chips)
Nonstick cooking spray


Preheat waffle iron and lightly spray with nonstick cooking spray. I only sprayed the first time an didn't have any problems with sticking. Place 1 scoop per waffle of batter (I used a small ice cream scoop) and close iron.


Cook for about 30-45 seconds (the original recipe said 1 1/2-3, my cookies would have been dried out or burned if cooked that long).


Carefully use a fork to lift out.


Serve warm with ice cream or store in an air tight container.


Out of the entire batch only one cookie didn't make it. I think it's batter to chocolate chip ratio was a little too high and it fell apart. I think these would also be excellent with blueberries. I am now very interested in trying other things in the waffle iron. I might have to let some of my bananas go bad so I can try some sort of banana bread in there!


The Girl Creative Photobucket"/>Todays Creative Blog lil luna link party button Somewhat Simple

Bathroom Hooks

I hate doing laundry. With 4 little kids I do a lot of laundry! In my efforts to reduce the amount of "unneeded" laundry I was doing, I hung some hooks in our bathroom.


My kids would take their bath or shower and toss the, only used once, towel in the laundry basket. By hanging their towels on hooks I have reduced the number of towels I wash by 8 each week. Basically a load!!


Well worth it in my book!

Tuesday, May 24, 2011

Recipe: Green Enchalada Tostada

I love Mexican food! This recipe over at Brown Paper Packages hit all the right flavors for me! Green Enchilada Tostadas! It's basically an open face enchalada done in the crock pot! I love the crock pot!  Even the kids loved it


It was my first time frying tortillas. I think I need to do them a little longer next time.


Recipe: Chocolate Peanut Butter Bars

My daughter and I decided to try a new dessert on Sunday. Chocolate Peanut Butter Bars from Tastes of Wonderful. They were pretty wonderful, very rich and chocolaty. I would have liked a little more peanut butter and less chocolate though. All in all a fun change from our standard chocolate chip cookies we make each Sunday afternoon.


I did omit one ingredient, vanilla. This wasn't on purpose, just an oversight and it was fine without it. On the chocolate I used 60% cacao bittersweet chocolate chips. On the peanut butter I used chunky, I'm just a chunky PB kind of person. Enjoy!


Peanut Butter Chocolate Bars


by Greta White

Combine:

1 pkg. plain yellow cake mix

1 stick melted butter

1 c. creamy peanut butter

2 eggs

Press this into a 9X13 pan reserving 1 1/2 c. of the mixture to crumble on top.

Melt:

1 (12 oz) pkg. chocolate chips

1 can sweetened condensed milk

2 T. butter

Melt on low heat in a small pot. Remove from heat and add:

2 tsp. vanilla

Spread chocolate mixture over the mixture pressed in the pan and then crumble the 1 1/2 of reserved cake mixture on top. Bake for 20-25 minutes at 325 degrees. Cool completely before cutting into bars.


Thursday, May 12, 2011

Recipe: Yakitori (Japanese Skewered Chicken)


I tried something out of my comfort zone for dinner tonight and it was a success!! I made Yakitori with brown rice. Here's a little blurb about Yakitori on Wikipedia:


Yakitori (焼き鳥/やきとり/ヤキトリ?), grilled fowl, is commonly a Japanese type of skeweredchicken. The term Yakitori can also refer to skewered food in general. Kushiyaki (skewer grilled), is a formal term that encompasses both poultry and non-poultry items, skewered and grilled. Both Yakitori and Kushiyaki mean the same, so the terms are used interchangeably in Japanese society.

The average yakitori is made from several bite-sized pieces of chicken meat, or chicken offal, skewered on a bamboo skewer and grilled, usually over charcoal.

Diners ordering yakitori usually have a choice of having it cooked with salt (shio) or with tare sauce, which is generally made up of mirin, sake, soy sauce and sugar. The sauce is applied to the skewered meat and is grilled until delicately cooked.

So I started by making the sauce. I used: chicken broth, soy sauce, apple juice (used in place of mirin), sugar, garlic, ginger & sesame oil.   After this comes to a boil and then simmers for 10 minutes, a mixture or cornstarch and water are added. Bring to boil again and the cook for 5 minutes. Strain the sauce and reserve 1/2 cup for later.


Then the assembly of the skewers. I used chicken tenders cut into pieces that were 1 1/2 to 2 inches long and green onions the same length.   These were alternated on a pair of wooden skewers that had been soaked in water for at least 30 minutes (this keeps them from burning, kind of!). I used about 1 tender and 1 green onion per set of skewers.

Onto the grill. Preheat to medium to medium high (our grill was at about 350-400) and place the skewers on.

Then baste the top side.

Turn the chicken every 2-3 minutes, basting the top each time until the chicken is cooked through.


We served this with brown rice (and some store bought egg rolls).

We gave it 2 thumbs up for flavor. Even my 3 picky eaters enjoyed it.


Yakitori


(Adapted from Cuisine at Home Issue No 87)


SAUCE:


1 C low sodium Chicken Broth


3/4 C low sodium Soy Sauce


1/2 C  Apple Juice


1/4 C Sugar


4 cloves Garlic, smashed


1 tsp fresh Ginger, minced


1 tsp Sesame Oil


COMBINE:


1 TBSP Cornstarch


1 TBSP Water


SKEWERS:


1 1/2 pounds boneless skinless chicken tenders cut into 1 1/2-2 inch peices


2 bunches green onions cut into 1 1/2 to 2 inch peices


Wooden Skewers


Combine sauce ingredients in a sauce pan and bring to a boil then simmer for 10 minutes. Then add cornstarch/water mixture and bring to boil, then cook for 5 minutes. Strain and reserve 1/2 cup for dipping later.


Soak wooden skewers for 30 minutes. Alternate chicken and green onion on a pair of skewers. Place on a medium high grill and baste the top every 2 to 3 minutes until cooked through (about 15 minutes).


Wednesday, May 4, 2011

Chicken Wire Photo Frame


When I saw U-Create's may "Create with me"  challenge I knew I needed to join in. I had a spot that needed something! I headed over to Home Depot to check out some wood. I knew I wouldn't be able to find a frame large enough for the space I wanted to fill. Here's what I used:


  • 3 picket fence posts ($.68 a piece at my local Home Depot)

  • 4 flat "L" brackets

  • Spray Paint

  • Chicken Wire (something to cut it with too!)

  • Staple gun


At Home Depot I had them cot the pointy tip off each post and then cut one post in 1/2. This gave me all 4 sides for the frame.


After lightly sanding I screwed the brackets into each of the four corners


Then spray paint! I used a light coat of brown to "darken" the wood then a stone color to give a white wash effect.

I also sprayed the chicken wire brown


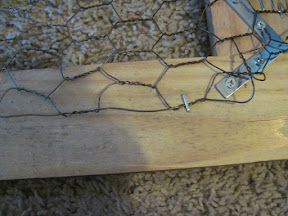
Then I stapled the chicken wire into the back


Hung it on the wall

Grabbed some clothes pins and we're good to go!

I might jazz up the clothes pins later, but for about an hour of effort I'm happy with the result!


lil luna link party buttonSomewhat Simple


Recipe Review: Banana Cupcakes with Chocolate & Peanut Butter Cream Cheese Frosting


This week is Teacher Appreciation.  I was asked to bring in some cupcakes and I found this recipe over at "How Sweet it is" and had to try them!

All in all they're pretty darn good. The recipe was easy to follow. I didn't have buttermilk so I made some with milk and vinegar. The only issue I had was with the frosting. I made a batch of the peanut butter cream cheese frosting and could have frosted 3 or 4 batches of cupcakes! I also wanted to do the chocolate, so I improvised.  After frosting with the peanut butter frosting I added 2 TBSP of cocoa powder to the frosting and finished with that. Yum!


Here are some of the other cupcakes that ladies brought in!