Showing posts with label scrapbook paper. Show all posts

Thursday, October 7, 2010

Wood Saying: Thanks

My awesome cousin picked up some great wooden letters for me at a shop in Idaho Falls, ID called Cut it Out.


I LOVE the font!!

I took the letters and did a bit of sanding to smooth down any rough spots and then painted the sides back and just over the edge of the front.

Next I picked out some fun FALL scrapbook paper and roughly cut it to fit my letters and modge podged it on.

One it was dry I took a sanding block and sanded the edges until the paper wore away.

It give a great distressed look to the paper.


After a little bit of embellishing I was done!

I love how it turned out. I have JOY waiting for me to do in the same way in a couple of weeks!


giveaways

Friday, September 24, 2010

Fall Frames

I've seen similar projects floating around blogland and decided to try my hand at my own. Here's what you need to make this project:


  • 4 mismatching frames (mine were a mix of 3x5, 4x6 and 5x7 frames from the Dollartree)

  • Spray paint (I used black)

  • Die Cut letters (I used black vinyl)

  • Scrapbook paper

  • Any wanted embellishments


I started out by removing the backs and glass from all of the frames, getting them ready to be spray painted:


Then they got a couple of coats of black spray paint:


Next I picked my scrapbook papers and cut them to size. I used scraps that I had in Fall colors. I also cut my letters to spell "FALL"


After applying the letters I added some ribbon and buttons to jazz up the frames:


And the final product on my piano.


For now I have fall leaves as well as my "Jar Jack-o-Lanterns"

I could see making this same project spelling a variety of words like Winter and Spring. I think Love or Lucky would be cute too!


giveaways


idea room

Saturday, September 11, 2010

Butterfly "goodie bag"...

I meant to blog about this cute simple craft right after Emma's birthday. But time got away from me and here we go. I got the idea out of the March 2010 Family Fun magazine and then made some changes to meet my needs. We had a butterfly themed birthday party and I thought it would be fun for the kids to help put together their own goodies for their goodie bags!

Here's what you need to get started: clothes pin, scrapbook paper, googly eyes, glue, pipe cleaner


~Cut your scrapbook paper down to fit one one side of your clothes pin and glue it on. Emma helped me and we used a glue stick. If you wanted them to be more durable you could use modge podge.

~Then glue on your googly eyes and take a short piece of pipe cleaner (about 2 inches). Fold it in half and stick it inside the clothes pin with a dot of glue. After it dries adjust your "antenna" to an angle you like.

We made enough for two butterflies per child:

~Then take a snack sized ziploc bag and fill with candy. Don't fill it too full or you butterfly body won't fit. Once full take your butterfly body and stick it in the middle of your ziploc bag:


The kids had a blast filling their bags and making their own butterflies!

This was a great party favor but would also be a fun add on to a preschool lesson on the life cycle of a butterfly!


family values craft...

In my blog stalking I came across the cutest idea for a sign with words to describe your families values. Kierste over at Brown Paper Packages made a darling version that I then modified to meet my own needs.

I started out by shopping around at our local thrift stores for a canvas. I knew I could find one cheaper than buying one new. I found that you do NOT want to buy "artwork" at our local Goodwill. The cheapest one I found there was $29 for an 11x14 ugly piece of work! I was able to find this one for $5 at DART. It measures 15x20 inches. Wal-mart also carried blank canvas.

When I got it home I painted is all black!
Then I started picking out all of the papers I wanted to use. They don't all necessarily match, but I think they all coordinate. Some of the paper I used was from a 6x6 fat book, so my top strip measures 2 1/2 x 12 and the short strips are 2 1/2 x 6.


After I knew where I wanted each of them I started modge podging them down.Be generous with your modge podge! You want to make sure that each strip is stuck down well. Continue to lay out and stick down all of your strips. Once there all down, do another quick coat over the top just for good measure!


Then let you canvas dry. I was somewhat impatient with mine and only let it dry for about 30 minutes or so! While it was drying I chose my words and cut my vinyl (I used black). I used a variety of fonts, but they all fit in the 2 1/2 x 6 inch strip of paper.

I also added some little vinyl flowers to jazz it up. Then I applied all of the vinyl and it was done! I love how it turned out. I put it on a wall that the kids see while sitting at the kitchen table. I hope to make these words a part of our family discussions during dinner.


If you don't have access to a piece of canvas a wide piece of wood would work great for this project too. Also if you don't have access or don't want to use vinyl, you can print from your home printer onto your scrapbook paper or use paint pens to write your words.


Friday, September 10, 2010

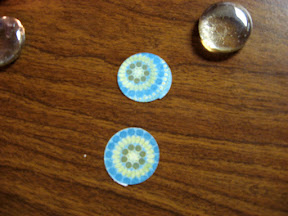
Marble Magnets


The first time I made marble magnets was at least 2 years ago. The entire concept of personalizing magnets with your own pictures and paper was a great idea to me. We even did it at a Super Saturday for HFPE. Over the last 2 years I've randomly made more and then it dwindled away. Then last week I decided to make them again after reading in a few different places that you can use diamond glaze to adhere the paper to the marble! Yet another use for a great product. Now this doesn't diminish my love for modge podge it still can't be beat for many, many applications!

So, go out to your Dollartree and buy yourself some glass marble accents. The dollartree is seriously the best place to find them. They might to be perfectly clear or round, but a $1 for about 25-you can't beat a price like that!

Print some pictures or grab your favorite scrapbook paper and cut out to the size you need (they're ususally 1 1/8 inches or so)

Put a small amount (smaller than a dime) of diamond glaze on the back of the marble.

Place your picture on and press evenly until the diamond glaze has evenly coated the picture and marble.

Let it dry and glue on a magnet. I prefer usuing E6000 to glue my magnets on and I buy my rare earth magnets here: (http://www.dealextreme.com/products.dx/category.1105) they have free shipping, but it does take a couple of weeks to get to you.

I think they are much clearer and easier to make than with the Modge Podge. It's a fun way to have seasonal magnets or family pictures that have a purpose. It's also an easy homemade gift!

I also wanted to add a picture of the finish Baby's ABC book we made at the baby shower a couple of weeks ago. After all of the letters were finished, I laminated the pages and had it bound at Staples:


I also finished up our family birthday calendar. Now I need to get them all mailed out!


I hope everyone has a great Veteran's Day and weekend! We're headed on a little family trip for a baptism-Go Bridget!! I'm super excited to see family, get family pictures taken, go the temple, go to the zoo, do some shopping and play some games!!


Saturday, September 12, 2009

Articles of Faith Cards & Apostle Cards


Looking for a way to get more out of General Conference?

I wanted a little something for Bud to follow to help him maybe get a little more out of conference. I found a few conference packets on Sugardoodle.net at the conference page. But I found one that was my favorite here: General Conference Activity Cards. After printing it out I decided that I'm going to print one for N8 and I as well. It has a place to put the choir info, a word search, a page for each apostle, color the ties page and your testimony(16 printed pages that you cut in half). Hopefully this will help us all get a little more from conference this year!


While I was searching on Sugardoodle I also found 2 other "quiet" type books to make. The first is an article of faith book. Each article of faith has a image to help you remember the basics of that particular article of faith. Then on the back it has the entire article of faith. I laminated them and put a colored piece of card stock to make them more colorful. Benjamin at one point in time could say all of his articles of faith and can still do them with a little bit of help, but it's great practice.


The other is the 1st Presidency and Quorum of the 12's pictures then on the back a little info like: birthday, mission, marriage and interesting facts. I though this would be great for the kids to be more familiar with their faces and learn a little more about their lives. These I also laminated (I love my laminator!) and put some colored card stock with them as well. You can find it here.