Showing posts with label Decor. Show all posts

Sunday, May 29, 2011

Bathroom Hooks

I hate doing laundry. With 4 little kids I do a lot of laundry! In my efforts to reduce the amount of "unneeded" laundry I was doing, I hung some hooks in our bathroom.


My kids would take their bath or shower and toss the, only used once, towel in the laundry basket. By hanging their towels on hooks I have reduced the number of towels I wash by 8 each week. Basically a load!!


Well worth it in my book!

Wednesday, May 4, 2011

Chicken Wire Photo Frame


When I saw U-Create's may "Create with me"  challenge I knew I needed to join in. I had a spot that needed something! I headed over to Home Depot to check out some wood. I knew I wouldn't be able to find a frame large enough for the space I wanted to fill. Here's what I used:


  • 3 picket fence posts ($.68 a piece at my local Home Depot)

  • 4 flat "L" brackets

  • Spray Paint

  • Chicken Wire (something to cut it with too!)

  • Staple gun


At Home Depot I had them cot the pointy tip off each post and then cut one post in 1/2. This gave me all 4 sides for the frame.


After lightly sanding I screwed the brackets into each of the four corners


Then spray paint! I used a light coat of brown to "darken" the wood then a stone color to give a white wash effect.

I also sprayed the chicken wire brown


Then I stapled the chicken wire into the back


Hung it on the wall

Grabbed some clothes pins and we're good to go!

I might jazz up the clothes pins later, but for about an hour of effort I'm happy with the result!


lil luna link party buttonSomewhat Simple


Sunday, April 17, 2011

Blooming Branches

A friend and I (Thanks Ashley!!) were asked to create centerpieces for our LDS Stake Women's Conference. We were not told what we needed to make, only that it needed to be Springy! Here's what we came up with:


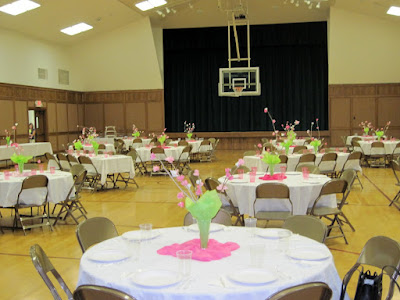
My house has been full of blooms for the last couple of weeks as we worked on making all 24 of them!


Here's what you need if you want to make your own.


  • small branches

  • tissue paper

  • scissors

  • hot glue gun & glue

  • vase


We started with Dollartree vases and put 1 piece of tissue paper in vase.


Then we filled the vase with branches. Since these were going on large tables we used large/taller branches.


Then onto the blossoms.


You need a square of tissue paper (anywhere between 3-5 inches square):


fold it in half:


then fold one corner over 1/3 of the way:


the fold the other corner to the opposite corner:


fold that in 1/2


now cut a rounded piece off the top (the deeper the cut the deeper the petal):


here's what it looks like:


now fold it up from the center


and twist the bottom and you have your blossom!


put a small amount of hot glue on the end and CAREFULLY put it on the branch. I think I lost most of the feeling in my fingertips after doing these!


And the final product:


The Girl Creative


Get Your Craft On Tuesday


Tuesday, April 12, 2011

Hooked Entryway

Here is the wall just behind our front door before:


and here it is after:


Much better!


I used 6 packs of hooks (purchased at Walmart for about $2.50 per 2 hooks) for a total of 12 hook, 2 per person. Then I made some vinyl with our names so we would know where to hang our stuff! I used a square piece of scrap paper to layout the vinyl & hooks:

Then I marked a level line on my wall and evenly spaced it out. For each hook & vinyl- I rotated the layout and alternated top or bottom of my level line so they wouldn't all be in the same space:


and now I should find no more backpacks, coats, etc on the floor!


Ok, that might be wishful thinking. But now when I find them on the floor I have a spot to put them and the kids have a spot to go and find them!


lil luna link party button

Wednesday, March 30, 2011

Make your own "Chocolate milk glass"...


I was initially inspired by these milk glass Christmas trees over here, but needed something a little different. I needed a different color. Let's say "chocolate milk glass"!


I started with an inexpensive (dollartree!) glass.

Then I used a plastic grocery bag and carefully taped it around the top rim of the glass:

(Please disregard my messy counter top!)
Then outside I went to spray! I used the cheapest brown spray paint I could find and just did light coats, allowing it to mostly dry in between.

Here's what I needed it for, faux blossom branches!

I think this would be awesome to do in all sorts of colors. I could see pinks in a girls room, robin's egg blue for Easter.
A simple quick way to jazz up inexpensive glass.


The fun blossoms in the vase will be an upcoming tutorial!


giveaways