Showing posts with label kids. Show all posts

Wednesday, September 4, 2013

Rubber band bracelets-no loom needed!

Last week I saw on a rubber bands posted on a deal site. I checked it out and was curious what they were for. It turns out you can make pretty awesome little bracelets out of rubber bands! I ordered my rubber bands from the rainbow loom website, but only ordered rubber bands and "c" clips, no loom. You don't need a loom to make regular rubber band bracelet or the fishtail rubber band bracelet. My 8 year old and her 10 year old friend had a blast making them.


So you need a bunch of rubber bands (I ordered the mixed pack but will be ordering more in specific colors) and clips. Each back ordered from rainbow loom comes with 25 "c" clips.


Pick out your colors, if doing an alternating pattern 2 take the 2 different colors and lay them on top of each other.Then loop them through each other and pull tight.


Then take your next color fold it in half and slid it through one end

continue doing this with alternating colors until you reach your desired length.

Then slide a "c" clip on the one end, then the other.


A variety of colors


Alternating colors

All done!!


To make a fishtail:


Take one color and put it on your middle finger, twist it once and put the other side on your index finger.

Then place 2 more rubber bands on you finger, no twisting (I chose alternating colors, but have also done a rainbow).

Then take once side of the bottom rubber band and pull it to the middle, taking it off your finger. Do that to the other side. You should now have 1 rubber band in the middle and two on your fingers.


Add another rubber band to your finger (NO TWISTING AFTER THE FIRST RUBBER BAND!) and pull the bottom rubber band to off and to the middle.

Continue, and you begin to see the fishtail!

Continue to you desire length and attach a "c" clip.


A pattern of 3 colors


Alternating colors


Rainbow!


This is a great craft for any age, for boys and girls, preteen, teen and adult. Buy rubber bands in your school colors, holidays, the sky is the limit!


Linked up at: The Girl Creative, Classy Clutter, sugarbeecrafts, Ginger Snap Crafts

Saturday, June 11, 2011

Homemade Threading Game

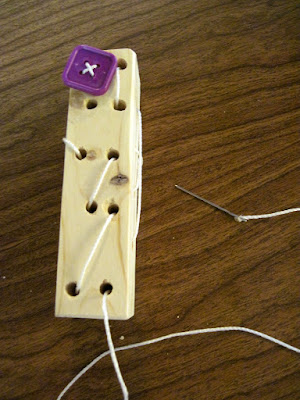
I love things that keep little fingers busy. I love them even more if I can make it myself! I saw this threading game on minieco a few weeks ago and fell in love with it. I didn't have have large sticks around so I improvised!

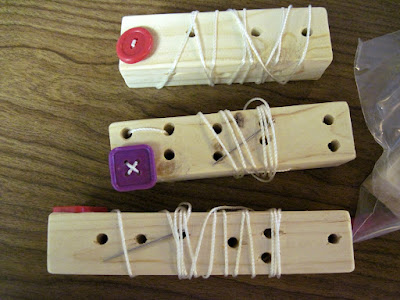
I used a scrap piece of 2x2 and cut it to about 6 inches. Then I drilled holes randomly through it. There was no rhyme or reason to the holes! After that I sanded it down. For the string, I used mason string (it was cheap and strong, a shoelace, yarn, twine, whatever you have would work fine). I threaded it through one hole and the onto a button and tied it off. Then on the other end of the string I threaded a blunt needle (plastic needles would be best, but our local Walmart happened to be out!!). Threaded it on and burned the end so the needle can't come off.


It's not perfect. A woodworker would mostly be appalled. It's simple, easy and fun for kids. That's really all that matters to me!!


Beneath the Rowan Tree


Thursday, June 9, 2011

Number Wheel

Finding fun and educational toys for preschool age kids to do in the car, at church or at home can be a challenge. I found a fun idea for a number wheel and thought I would give it a whirl!

This number wheel will help your preschooler recognize numbers, count, match and practice fine motor skills. What you need is:


  • a copy of  a pie chart divided into 10 with dots representing numbers, printed on card stock (one can be found at the bottom of this post)

  • Laminator (this is optional, but will really help your number wheel last much longer)

  • 10 clothes pins

  • A fine tip permanent marker


After you print, cut out and laminate your number wheel you need to number your clothes pins. I chose to put both the number and dots on one side and just the number on the other.


The whole thing fits nicely in a quart size ziploc bag.


Linking up here:

Just a girl Join  us Saturdays at tatertotsandjello.com for the weekend wrap   up           party! Beneath the Rowan Tree


Monday, June 6, 2011

Summer Daily Schedule

Summer is almost upon us! Our last day of school is Thursday. We have loads of trips and activities already planned, but the day to day that we're home I wanted something fun for the kids to look forward to. I came across this idea on Pinterest and was taken to one of my favorite blogs: Somewhat Simple. The idea was originally posted back in June of 2010 when she was featuring some summer boredom ideas. I wanted to rework it  a little bit. I think it's perfect for my kids!

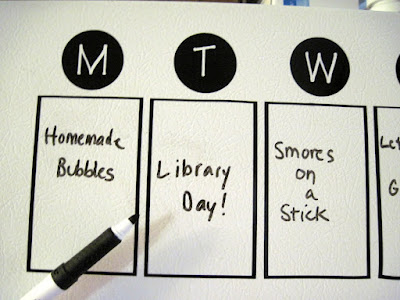
Each weekday there is a different theme that allows you & your kids to plan the week ahead. My kids like to know what's coming. I wanted to be able to write it down for them (and me!) to see what we had planned. So I made it into vinyl and added the words off to the right.


I put it on the top of my fridge and now I can simply use a dry erase marker and write down our weeks activities!


When the summer is done I will take down the words (make something Monday, etc) and use it as my meal calender!


For those interested in a paper copy I have a down-loadable version as well.  This is my first time doing this, so be kind. It would be simple to print and write in each week, or laminate and reuse!


Summer Daily Schedule

I'm linking up here:
Todays Creative Blog


Tuesday, April 12, 2011

Hooked Entryway

Here is the wall just behind our front door before:


and here it is after:


Much better!


I used 6 packs of hooks (purchased at Walmart for about $2.50 per 2 hooks) for a total of 12 hook, 2 per person. Then I made some vinyl with our names so we would know where to hang our stuff! I used a square piece of scrap paper to layout the vinyl & hooks:

Then I marked a level line on my wall and evenly spaced it out. For each hook & vinyl- I rotated the layout and alternated top or bottom of my level line so they wouldn't all be in the same space:


and now I should find no more backpacks, coats, etc on the floor!


Ok, that might be wishful thinking. But now when I find them on the floor I have a spot to put them and the kids have a spot to go and find them!


lil luna link party button

Saturday, September 11, 2010

Butterfly "goodie bag"...

I meant to blog about this cute simple craft right after Emma's birthday. But time got away from me and here we go. I got the idea out of the March 2010 Family Fun magazine and then made some changes to meet my needs. We had a butterfly themed birthday party and I thought it would be fun for the kids to help put together their own goodies for their goodie bags!

Here's what you need to get started: clothes pin, scrapbook paper, googly eyes, glue, pipe cleaner


~Cut your scrapbook paper down to fit one one side of your clothes pin and glue it on. Emma helped me and we used a glue stick. If you wanted them to be more durable you could use modge podge.

~Then glue on your googly eyes and take a short piece of pipe cleaner (about 2 inches). Fold it in half and stick it inside the clothes pin with a dot of glue. After it dries adjust your "antenna" to an angle you like.

We made enough for two butterflies per child:

~Then take a snack sized ziploc bag and fill with candy. Don't fill it too full or you butterfly body won't fit. Once full take your butterfly body and stick it in the middle of your ziploc bag:


The kids had a blast filling their bags and making their own butterflies!

This was a great party favor but would also be a fun add on to a preschool lesson on the life cycle of a butterfly!