Saturday, June 25, 2011

Super Simple Sugar Cookie Tarts

I first saw this concept over at Joy's Hope. I loved the idea and Father's Day was a great opportunity to try it out! She called them Puffs, but for me there were a little more like a tart. I also slightly changed the recipe to fit my needs.

Sugar Cookie Tarts with Fresh Fruit


To make these you need:


  • 1 package of refrigerated sugar cookie dough. I used the tube of dough because that was available.

  • 1/2 block of cream cheese, softened

  • 1/2 Cup powdered sugar

  • 1/2 container of cool whip, not frozen


Mix thoroughly


  • fresh fruit sliced thinly or in small chunks: peaches, strawberries, blueberries, etc.


Also needed:


  • 24 mini muffin tin

  • non-stick spray (Pam)

  • mini tart shaper (it is made by pampered chef, I'm not sure what else could be used but a great friend lent me hers!)


Start by thoroughly spraying your mini muffin tin with Pam. Next unwrap your cookie dough and slice off a round about 3/4 inch wide

and cut into 4 pieces.

Place each piece in the muffin tin

Bake at 350 for about 8 minutes. This is less time than the package directs, but you need them slightly undercooked.
Pull out the cookies and they should be puffed up in the muffin tin.

As soon as you take them out use the tart shaper to push the cookie down into the muffin tin, forming your tart crust.

Let cool and then carefully remove. I needed to slide a knife around the edges to release them from the tins.

Now fill a ziploc bag with your cream cheese mixture and cut the corner off. Pipe the filling into each cup.

Place your fruit ontop and enjoy!

These were super simple and super yummy. They would be awesome for a finger foods party and were a great use of some fresh fruit I needed to use.


The Girl Creative Beneath the Rowan Tree Todays Creative Blog

Saturday, June 11, 2011

Homemade Threading Game

I love things that keep little fingers busy. I love them even more if I can make it myself! I saw this threading game on minieco a few weeks ago and fell in love with it. I didn't have have large sticks around so I improvised!

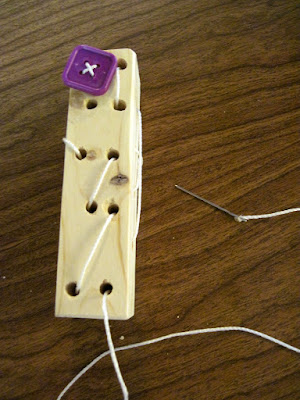
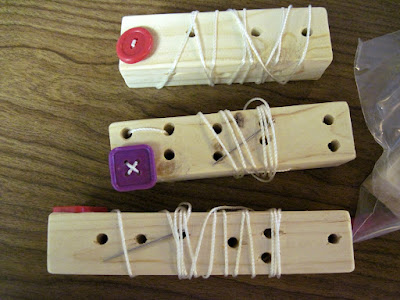
I used a scrap piece of 2x2 and cut it to about 6 inches. Then I drilled holes randomly through it. There was no rhyme or reason to the holes! After that I sanded it down. For the string, I used mason string (it was cheap and strong, a shoelace, yarn, twine, whatever you have would work fine). I threaded it through one hole and the onto a button and tied it off. Then on the other end of the string I threaded a blunt needle (plastic needles would be best, but our local Walmart happened to be out!!). Threaded it on and burned the end so the needle can't come off.


It's not perfect. A woodworker would mostly be appalled. It's simple, easy and fun for kids. That's really all that matters to me!!


Beneath the Rowan Tree


Thursday, June 9, 2011

Number Wheel

Finding fun and educational toys for preschool age kids to do in the car, at church or at home can be a challenge. I found a fun idea for a number wheel and thought I would give it a whirl!

This number wheel will help your preschooler recognize numbers, count, match and practice fine motor skills. What you need is:


  • a copy of  a pie chart divided into 10 with dots representing numbers, printed on card stock (one can be found at the bottom of this post)

  • Laminator (this is optional, but will really help your number wheel last much longer)

  • 10 clothes pins

  • A fine tip permanent marker


After you print, cut out and laminate your number wheel you need to number your clothes pins. I chose to put both the number and dots on one side and just the number on the other.


The whole thing fits nicely in a quart size ziploc bag.


Linking up here:

Just a girl Join  us Saturdays at tatertotsandjello.com for the weekend wrap   up           party! Beneath the Rowan Tree


Monday, June 6, 2011

Summer Daily Schedule

Summer is almost upon us! Our last day of school is Thursday. We have loads of trips and activities already planned, but the day to day that we're home I wanted something fun for the kids to look forward to. I came across this idea on Pinterest and was taken to one of my favorite blogs: Somewhat Simple. The idea was originally posted back in June of 2010 when she was featuring some summer boredom ideas. I wanted to rework it  a little bit. I think it's perfect for my kids!

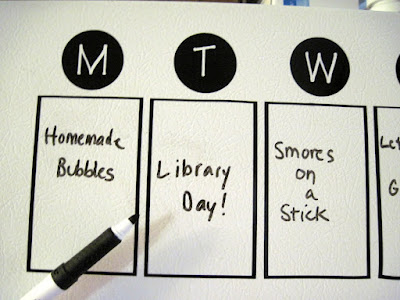
Each weekday there is a different theme that allows you & your kids to plan the week ahead. My kids like to know what's coming. I wanted to be able to write it down for them (and me!) to see what we had planned. So I made it into vinyl and added the words off to the right.


I put it on the top of my fridge and now I can simply use a dry erase marker and write down our weeks activities!


When the summer is done I will take down the words (make something Monday, etc) and use it as my meal calender!


For those interested in a paper copy I have a down-loadable version as well.  This is my first time doing this, so be kind. It would be simple to print and write in each week, or laminate and reuse!


Summer Daily Schedule

I'm linking up here:
Todays Creative Blog


Sunday, May 29, 2011

Recipe: Oatmeal Chocolate Chip Waffle Cookies

I came across these while browsing Pinterest (which I love btw, here are my boards if you are interested). I didn't own a waffle iron and headed over to Walmart and bought one just for this recipe. It was relatively cheap, less the $10 and I am glad that I got it. These cookies were quick, tasty and different. They tasted like a cookie yet cooked up fast. Start to finish with mixing up and cooking time was about 20 minutes.

I mixed up the dough/batter in a bowl rather than my Kitchenaid. It's not a large batch and is very quick to put together.


I found the original recipe here on Fine Cooking.  I made some minor changes and was happy with the result.


Oatmeal chocolate chip waffle cookies:


1/2 cup (1 stick) margarine, melted
1/2 cup plus 2 Tbs. firmly packed light brown sugar
2 large eggs
1 tsp. vanilla extract
3/4 cup unbleached all-purpose flour
1/2 tsp. baking soda
1/4 tsp. salt
1-1/2 cups old-fashioned rolled oats (I used quick oats)
3/4 cup chocolate chips (today I happened to have Ghiradelli 60% cacao bittersweet chips)
Nonstick cooking spray


Preheat waffle iron and lightly spray with nonstick cooking spray. I only sprayed the first time an didn't have any problems with sticking. Place 1 scoop per waffle of batter (I used a small ice cream scoop) and close iron.


Cook for about 30-45 seconds (the original recipe said 1 1/2-3, my cookies would have been dried out or burned if cooked that long).


Carefully use a fork to lift out.


Serve warm with ice cream or store in an air tight container.


Out of the entire batch only one cookie didn't make it. I think it's batter to chocolate chip ratio was a little too high and it fell apart. I think these would also be excellent with blueberries. I am now very interested in trying other things in the waffle iron. I might have to let some of my bananas go bad so I can try some sort of banana bread in there!


The Girl Creative Photobucket"/>Todays Creative Blog lil luna link party button Somewhat Simple

Bathroom Hooks

I hate doing laundry. With 4 little kids I do a lot of laundry! In my efforts to reduce the amount of "unneeded" laundry I was doing, I hung some hooks in our bathroom.


My kids would take their bath or shower and toss the, only used once, towel in the laundry basket. By hanging their towels on hooks I have reduced the number of towels I wash by 8 each week. Basically a load!!


Well worth it in my book!